


About NetSuite Standard Costing
When you use standard costs in NetSuite, each item has a certain cost associated with it. When you create a transaction with GL impact, the system will post the Standard Cost * Quantity to the GL account associated with the item. When the dollar amount of the transaction is different from the Standard Cost * Quantity, the system will post the difference to a variance account. There are multiple variance accounts, depending on the type of transaction. When you want to change the standard cost of an item, and inventory of the item exists, this will result in a change in the inventory asset account. This amount will be posted to another variance account.
Item Setup
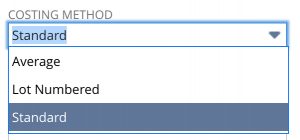
When setting up an item we must select “standard cost” for the costing method.
Now add the variance accounts to the item in the Accounting tab.

After saving the record, if you have multiple locations, make sure to add them in the locations subtab
Pipeline
The actual transaction that updates the standard cost record is the Inventory Revaluation transaction (Transactions > Inventory > Revalue Inventory Cost). This updates a single item’s cost. To update multiple items at once you would use Revalue Standard Cost Inventory (Lists > Accounting > Revalue Standard Cost Inventory). This can create multiple Inventory Revaluations at once.
The cost that is on the resulting Inventory Revaluation transaction is pulled from the Planned Standard Cost record that is usually created by the Planned Standard Cost Rollup.
If this is confusing, don’t worry, we will go through it step by step
Where does NetSuite know where to get the price to update the standard cost when it performs an inventory revaluation?
NetSuite retrieves the price from Planned Standard Costs records.
Planned Standard Costs
Let’s create one for our item.
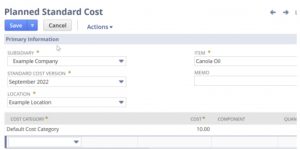
Here are the fields:
- Subsidiary
- Item
- Location
- Standard Cost Version
Standard Cost Version
is a way to keep track of different standard costs for the same item. When we perform an inventory revaluation, we can select which version to use. We’ll come back to this later.
In addition, we have a sublist of the costs associated with the item. We can add multiple costs to this sublist. Some costs can be associated with a component (if we have an assembly item). We will select the Default Cost category for now with a price of $10. When we save the record, the standard costs remain the same. When we perform an inventory revaluation, the standard cost will be updated to $10.
Inventory Revaluation
Now let’s perform an inventory revaluation for our item.
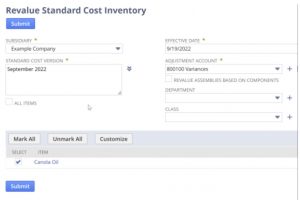
We have four fields to fill out:
- Subsidiary
- Standard Cost Version
- Effective Date
- Adjustment Account
The adjustment account is the account that will be used to post the inventory’s difference in value before and after it’s revalued. We don’t have any inventory yet, so it won’t post anything, but we still need to fill it out. Effective date is when you want to start using this amount on the transactions. We then check the items in the list. We only have one item with a planned standard cost. When we hit submit, the system will redirect us to the status page
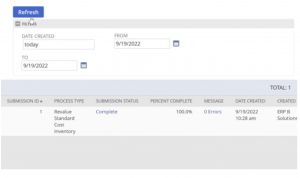
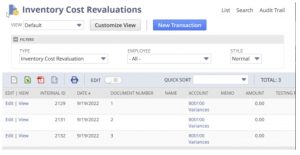
When it’s complete, we can head over to Transactions > Inventory > Revalue Inventory Cost to see the resulting Inventory Revaluation Record.
Planned Standard Cost Rollup
But what if we want to update multiple items at once? We could make a Planned Standard Cost record for each item, and then perform an inventory revaluation for all items at once, but creating a Planned Standard Cost record for each item is tedious.
This is where Standard Costs Rollup comes in.
It will create a Planned Standard Cost record for each item in the list, and we then can perform an inventory revaluation for all items at once.
Standard Cost Version
First, we have to create a Standard Cost Version (List > Accounting > Standard Cost Versions) record
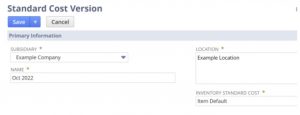
Let’s take a look at the fields:
- Subsidiary
- Name
- Location
- Inventory Standard Cost
Make sure the name is descriptive. Conventions I’ve seen are to use the short month and year. For example, “Jan 2019” or “Jan19”.
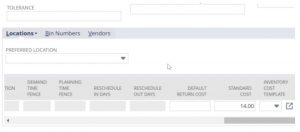
In location select all locations that you want to use this version for.
The next field is the most important field. This field determines where NetSuite will get the price to update the standard cost. There are three options:
- Average Cost – This will use the average cost of the item at the time of the revaluation.
- Last Purchase Price – This will use the last purchase price of the item at the time of the revaluation.
- Item Default – This is the “Standard Cost” field on the inventory subtab of the item record
Performing the Rollup
Now that we have a Standard Cost Version record, we can perform a Standard Cost Rollup (Lists > Accounting > Planned Standard Cost Rollup).
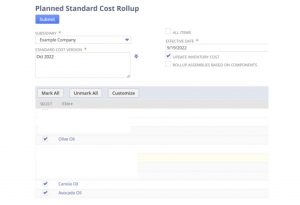
We have a few fields to fill out:
- Subsidiary
- Standard Cost Version
- Effective Date
We also have a few checkboxes:
- All Items
- Update Inventory Cost
- Rollup Assemblies Based on Components
The Standard Cost Version field is the same as the one we just created.
The Effective Date is when you want to start using this amount on the transactions.
The All Items checkbox will rollup all items in the subsidiary. If you don’t check this box, you can select the items in the sublist.
The Update Inventory checkbox needs to be checked if we want inventory items to show up in the sublist. Otherwise we will only see assembly items.
I will skip the Rollup Assemblies Based on Components checkbox for now.
I will cover updating assemblies in a future post. In the sublist, we will select a few standard cost items. Because we selected “Item Default” in the Standard Cost record, we have to make sure that we fill out the “Standard Cost” field on the inventory subtab of each item record.
When we hit submit, the system will redirect us to the status page.
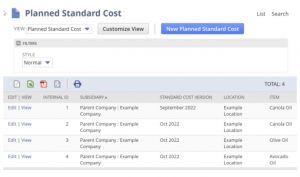
When it’s complete, we can head over to Lists > Accounting > Planned Standard Costs to see the resulting Planned Standard Cost records.
Inventory Revaluation
We can now perform an inventory revaluation for all items at once.
Let’s head over to Lists > Accounting > Revalue Standard Cost Inventory. As we can see it now has all three items.
When we hit submit the system will create three Inventory Revaluation records and the standard cost will be updated for all items.
In Conclusion Summary
It is important to understand the GL impact of various types of transactions.
For items that change cost often, or ones that vary a lot in the different standard costs, average costs is often the solution.
We have covered how to update the standard cost of an inventory item. We have also covered how to update the standard cost of multiple items at once.
Next time we will cover how to update the standard cost of an assembly item.
Questions on Standard Costing in NetSuite?
If you have any questions about standard costing in NetSuite or any accounting questions in general then please don’t hesitate to contact us via the contact form or booking a meeting directly with one of our experts:
Click here to Book a Free 30 minute meeting with a NetSuite Expert!
1 Comment
Losing money without these 5 NetSuite Reporting types for accuracy and visibility? - Swyft ERP - NetSuite Partners, Consultants & Developers
March 3, 2023[…] Standard Costing in NetSuite Explained […]